Apache JMeter Basis
by Nataliia Vasylyna | March 3, 2011 2:00 pm
I’ve been doing some self-training for a few weeks. This time the choice fell on performance testing and specifically on a very interesting and useful open-source tool from Apache. I decided to write little guides on how to use it, so I will not forget this, and it will be helpful for some newcomers.
Test Plan Development
A key concept in the JMeter is Test Plan. Test Plan of application is the sequence of steps that will be executed by JMeter.
The test plan may contain:
• Thread Groups
• Logic controllers
• Sample generating controllers
• Listeners
• Timers
• Assertions
• Configuration elements
 [1]
[1]Figure 1
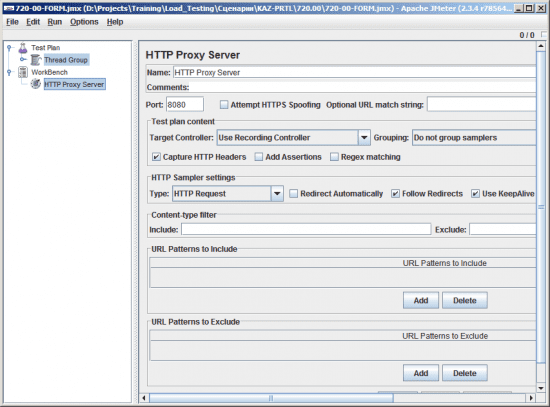
Figure 1 shows that the element tree initially consists of two items: Test Plan and WorkBench.
WorkBench – this is a temporary item. Point is that the interface of Jmeter is built on “drag transfer” of elements in the tree scenario from one place to another. You create plan tree, and then can move its parts to the Workbench and vice versa.
Only contents of Test Plan is executed during testing, and the contents of Workbench is not even saved to disk.
Use the shortcut menu item “Test Plan” or the application main menu “Edit -> Add -> Script Element” for infill of Test Plan.
Thread Group Creating
Thread Group element lets you specify the parameters of workload generated to the application. Its main parameters are:
- Number of threads – the number of simulated concurrent users working with the site;
- Ramp-up period – the time interval to launch next process;
- Loop count – the number of times the script will be executed within the Thread Group;
- Forever – the script will be executed always, until it is terminated explicitly;
- Scheduler – scheduling time of the script;
- Action to be taken after a Sample Error – action to be performed after the request will cause an error.
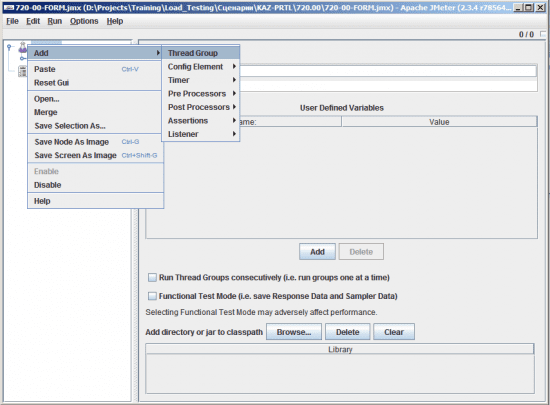
To add Thread Group from the context menu item «Test Plan» click «Add» -> «Thread Group» (see Figure 2).
 [2]
[2]Figure 2
Only inside the «Thread Group» element you can add requests – «HTTP Request», «FTP Request», «Web Service Request», etc.
HTTP Traffic Recording
Recording of custom test scenarios in JMeter performed by using an HTTP Proxy Server.
For work with this element is necessary:
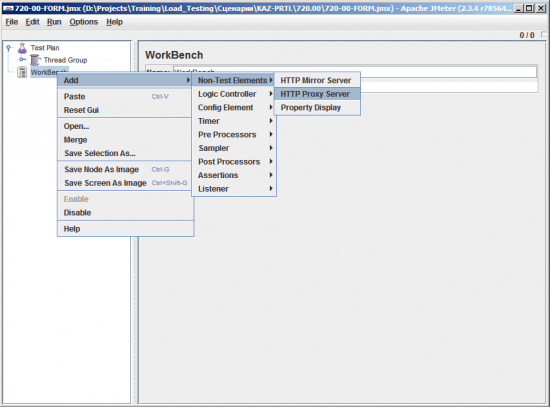
1. From the shortcut menu item “WorkBench” select «Add» -> «Non-Test Elements» -> «HTTP Proxy Server» (see Figure 3)
 [3]
[3]Figure 3
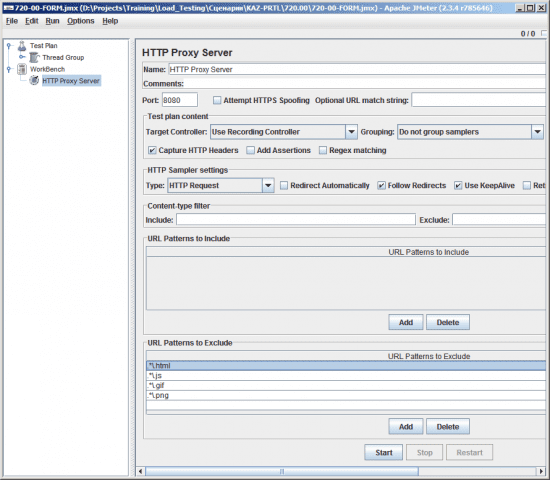
2. Specify the proxy port in the «Port»
3. Set up a filter using regular expressions (RegEx) for the recorded request to the following sections:
- URL Patterns to Include – requests included in the scenario;
- URL Patterns to Exslude – requests not included in the scenario;
For example: Filter «.* \. gif», established in section URL Patterns to will exclude from the scenario all requests with pictures in gif format. (see Figure 4)
 [4]
[4]Figure 4
4. Click the «Start»;
5. In the internet browser set your proxy settings the same as for the HTTP Proxy Server.
For example, in Internet Explorer, choose Tools -> Internet Options -> Connections -> Lan settings (see Figure 5)
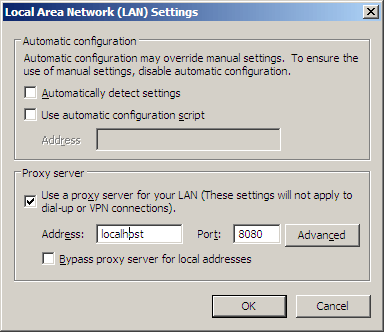 [5]
[5]Figure 5
6. Record the test scenario
7. Return to JMeter and click «Stop»
HTTP Requests Creating
For work with HTTP traffic JMeter provides element «HTTP Request». To create it you need to add an element «Thread Group» from the context menu for that item «Add» -> «Sampler ->« HTTP Request »(see Figure 6).
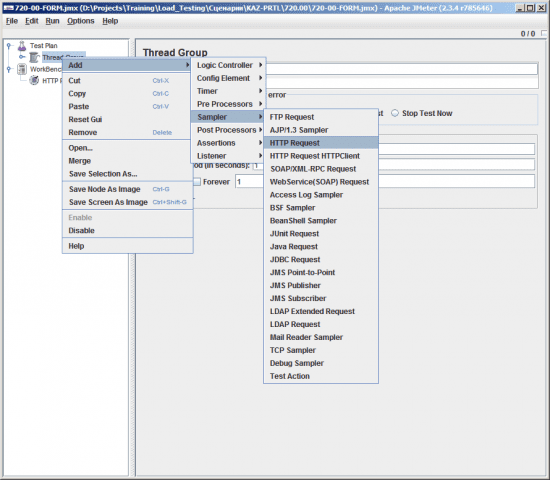 [6]
[6]Figure 6
In the setting of request you must specify the following parameters:
- Name – The name of the request
- Server name or IP – address of the web server (URL or IP-address)
- Port number – The port the web server (default 80)
- Protocol – protocol (the default HTTP)
- Method – A method of data transmission
- Path – The path to the executable file on the server
- Parameters – Transmit parameters and their values
To send a file in the request you must specify the parameter name and the file path in the section «Send files with request» (see Figure 7).
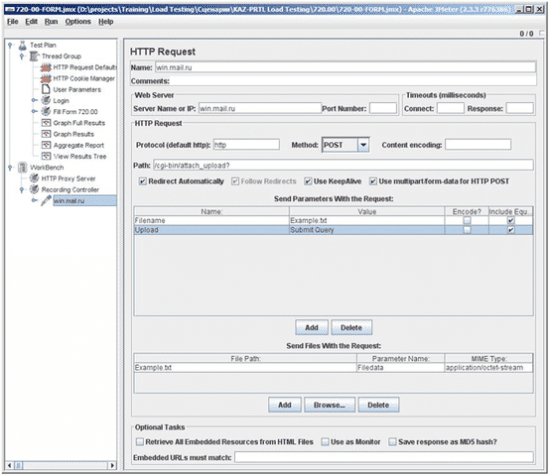 [7]
[7]Figure 7
Data Driven Requests Creating
Parameters Transfer via Variables
In JMeter is possible to specify the request in terms of variables that are defined by the user. For these purposes, use the element «User Defined Variables».
You should:
1. From the context menu item «Thread Group» select «Add» -> «Config Element» -> «User Defined Vaiables» (see Figure 8)
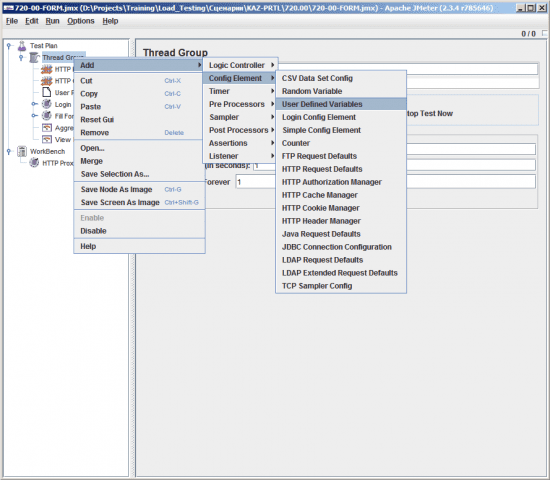 [8]
[8]Figure 8
2. In the form that appears, click the «Add»
3. Indicate the name and the value in the field «Name» and the «Value», respectively (see Figure 9)
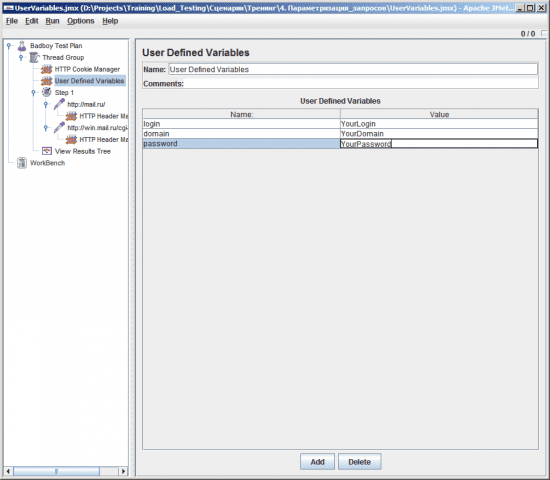 [9]
[9]Figure 9
4. Create new element «HTTP Request» and specify the necessary settings
5. Specify variable in value of request. Variables are specified in the format $ {VariableName} (see Figure 10)
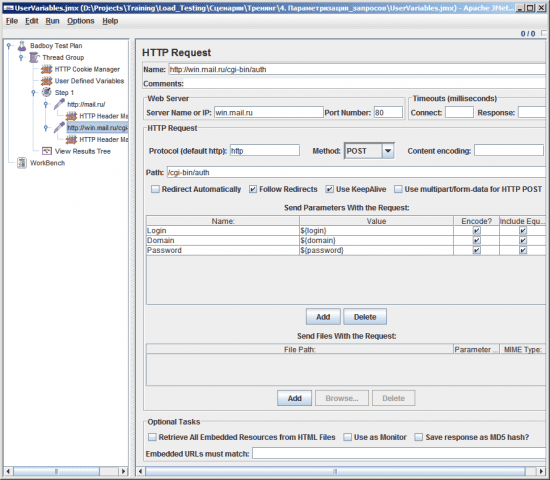 [10]
[10]Figure 10
Variable Assignment from File
For storing and reading the variable from the file is most convenient to use a «CSV Data Set Config». It is used to read lines from a file and partition them into variables.
To work with «CSV Data Set Config» follow these steps:
1. Create a file (for example, c: \ csvdata.csv) and define the values of variables (see Figure 11)
 [11]
[11]Figure 11
2. Open JMeter from the context menu item «Thread Group» click «Add» -> «Config Element» -> «CSV Data Set Config» (see Figure 12)
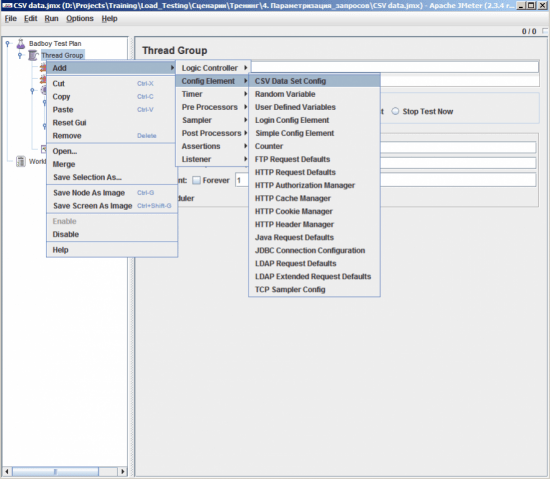 [12]
[12]Figure 12
3. In the form of the element «CSV Data Set Config» fill in the fields like Figure 13:
* «FileName» – the name of the data file (c: \ csvdata.csv);
* «Variable Names (comma-delimited)» – variable names separated by “,”;
* «Delimiter (use’t ‘for tab)» – separator character. In our case, this symbol is “,”
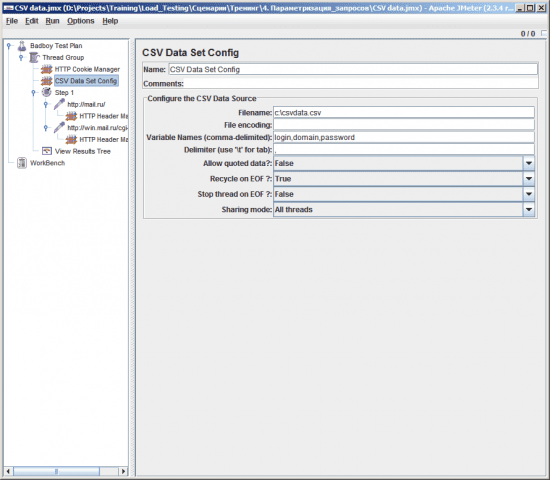 [13]
[13]Figure 13
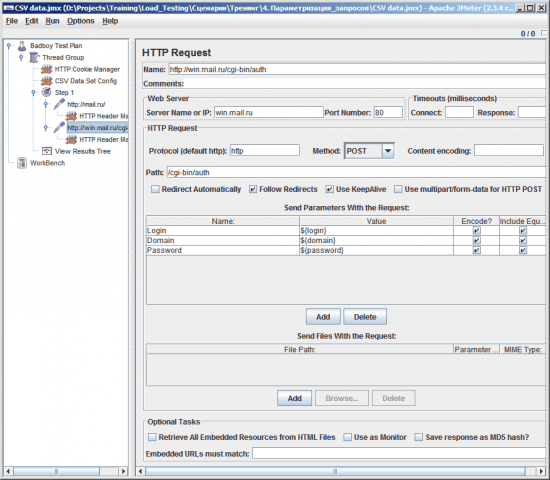
5. Create an element «HTTP Request» and specify the necessary settings
6. Define request variables in values. Variables are specified in the format $ {VariableName} (see Figure 14)
 [14]
[14]Figure 14
Creation Settings “by default” for HTTP Requests
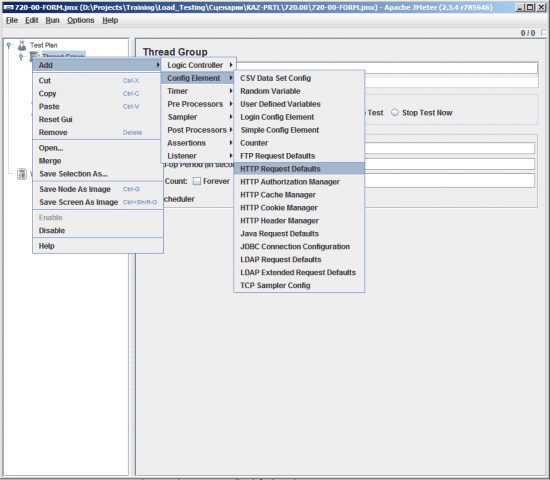
In order to optimize duplicate data (for example, if you want to test multiple services located on one site), it is possible to specify default settings. You should add a HTTP Request Defaults to «Thread Group» from the context menu. Select «Add» -> «Config Element» -> «HTTP Request Defaults» (see Figure 15).
 [15]
[15]Figure 15
In the default settings for the «HTTP Request Defaults» you can specify:
* Server Name or IP – address of the web server (URL or IP-address)
* Port Number The port the web server (default 80)
* Protocol – protocol (the default HTTP)
* Path – The path to the executable file on the server
* Send Parameters with request – transmitted parameters and their values
All the following «HTTP Request» elements will take these settings by default, so the need to specify for each subsequent request these settings is eliminated.
Creating HTTPS Requests
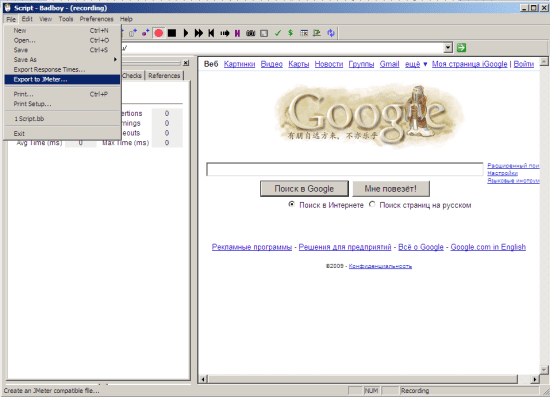
JMeter proxy server is unable to handle traffic through HTTPS protocol. For these purposes, you can use third-party tools, such as the Badboy.For this write the script in BadBoy and take advantage of the function «File»> «Export to JMeter …» (see Figure 17).
 [16]
[16]
Figure 17
However, it is worth remembering that there are enough elements of the Badboy script, which are not transferred to JMeter. Above all, actions recorded in Navigate mode, work with data sources (load data from excel-file), work with the schedule, etc. These actions need to be done in JMeter extra.
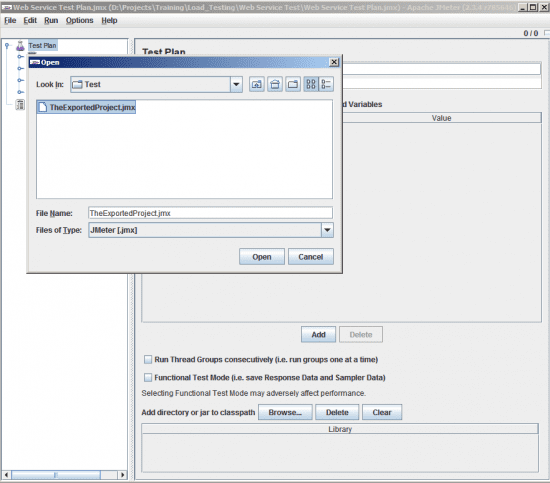
Next, open exported project in JMeter via main menu «File» -> «Open» (see Figure 18).
 [17]
[17]Figure 18
Working with EDS certificates
You can use can use the SSL Manager to work with the security certificates in JMeter:
1. Select the main menu «Options»> “SSL Manager” (Figure 19)
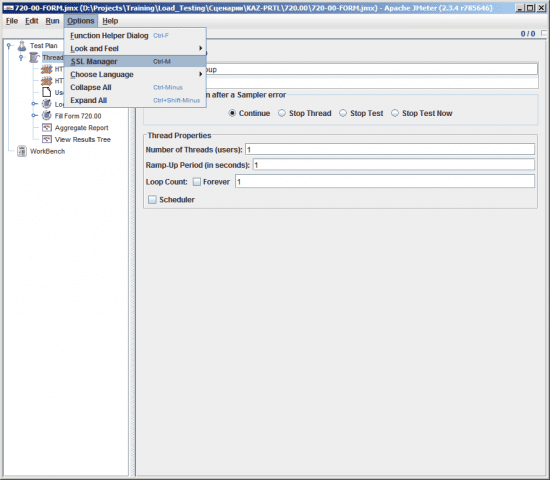 [18]
[18]Figure 19
2. In the window that appears, select the certificate file in the format of p12 (see Figure 20)
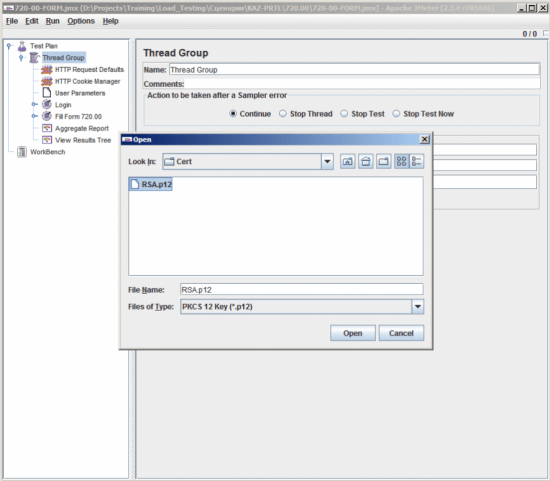 [19]
[19]Figure 20
3. During the test JMeter will ask you to specify a password for this certificate (see Figure 21)
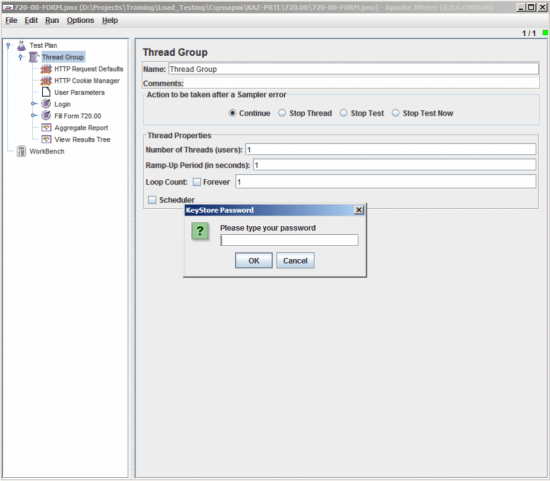 [20]
[20]Figure 21
In order to avoid the need to choose the certificate file at each start JMeter password and path to the certificate you can register only once in the configuration file system.properties.
To do this, follow these steps:
* In the bin directory of the root directory of JMeter open the file system.propeties
* Remove the comment from the lines and javax.net.ssl.keyStore javax.net.ssl.keyStorePassword, removing the symbol “#” at line
* Enter the line javax.net.ssl.keyStore path to the certificate, and in line javax.net.ssl.keyStorePassword its password
Example:
# Location of the keystore
javax.net.ssl.keyStore = C: \ \ certificates \ \ cert-481100001784 \ \ RSA.p12
# The password to your keystore
javax.net.ssl.keyStorePassword = 123456
Distributed Testing
One of the most important functions of JMeter is a tool for distributed control – when you can run Jmeter on several machines, but the management of these JMeter copies is executed from one central computer.
To configure distributed testing it is necessary to perform the following steps:
For servers:
* Run the file <java-home> / bin / rmiregistry.exe
* The file <jmeter-home> / bin / jmeter.properties uncomment from line server.rmi.create = false, delete the character “#” at beginning of line
* Run <jmeter-home> / bin / jmeter-server.bat
For the client:
* In file <jmeter-home> / bin / jmeter.properties specify hosts in a line remote_hosts. For example: remote_hosts = 10.18.11.101, 10.18.11.233, 10.18.11.81
* Restart JMeter
* Select the menu item «Run» -> «Remote Start» or the «Run» -> «Remote Start All» (see Figure 22).
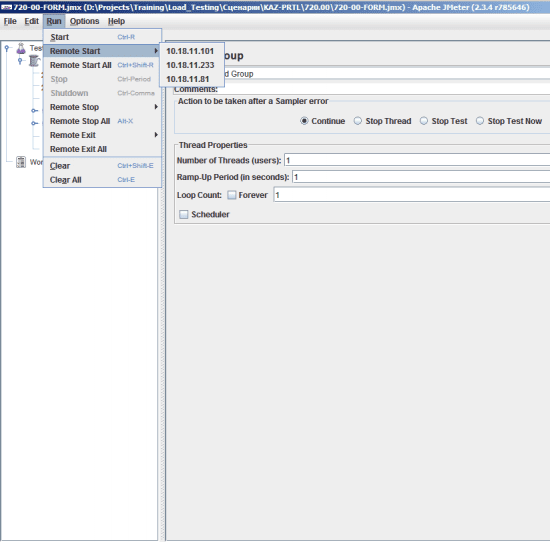 [21]
[21]Figure 22
«Remote Start» – launches a designated agent;
«Remote Start All» – runs all of the agents directly.
Source: http://andzhukov.blogspot.com
Learn more from QATestLab
Related Posts:
- [Image]: https://blog.qatestlab.com/wp-content/uploads/2011/03/pic01.png
- [Image]: https://blog.qatestlab.com/wp-content/uploads/2011/03/pic02.png
- [Image]: https://blog.qatestlab.com/wp-content/uploads/2011/03/pic03.png
- [Image]: https://blog.qatestlab.com/wp-content/uploads/2011/03/pic04.png
- [Image]: https://blog.qatestlab.com/wp-content/uploads/2011/03/pic05.png
- [Image]: https://blog.qatestlab.com/wp-content/uploads/2011/03/pic06.png
- [Image]: https://blog.qatestlab.com/wp-content/uploads/2011/03/pic7.png
- [Image]: https://blog.qatestlab.com/wp-content/uploads/2011/03/pic08.png
- [Image]: https://blog.qatestlab.com/wp-content/uploads/2011/03/pic09.png
- [Image]: https://blog.qatestlab.com/wp-content/uploads/2011/03/pic10.png
- [Image]: https://blog.qatestlab.com/wp-content/uploads/2011/03/pic11.png
- [Image]: https://blog.qatestlab.com/wp-content/uploads/2011/03/pic12.png
- [Image]: https://blog.qatestlab.com/wp-content/uploads/2011/03/pic13.png
- [Image]: https://blog.qatestlab.com/wp-content/uploads/2011/03/pic14.png
- [Image]: https://blog.qatestlab.com/wp-content/uploads/2011/03/pic15.png
- [Image]: https://blog.qatestlab.com/wp-content/uploads/2011/03/pic17.png
- [Image]: https://blog.qatestlab.com/wp-content/uploads/2011/03/pic18.png
- [Image]: https://blog.qatestlab.com/wp-content/uploads/2011/03/pic19.png
- [Image]: https://blog.qatestlab.com/wp-content/uploads/2011/03/pic20.png
- [Image]: https://blog.qatestlab.com/wp-content/uploads/2011/03/pic21.png
- [Image]: https://blog.qatestlab.com/wp-content/uploads/2011/03/pic22.png
- QA Automation Tools: Low-Code, No-Code, or Coding-Based?: https://blog.qatestlab.com/2025/03/27/qa-automation-tools-low-code-no-code-or-coding-based/
- Optimizing API Testing: Easy Scheduling with Effective Tools: https://blog.qatestlab.com/2024/06/06/optimizing-api-testing/
- Decoding the Science of Software Testing for Hardware: https://blog.qatestlab.com/2023/09/13/decoding-the-science-of-software-testing-for-hardware/
Source URL: https://blog.qatestlab.com/2011/03/03/apache-jmeter-basis/

